smallest possible space for a squat rack | How Much Space
Optimizing Inventory Turnover through Compact Strength Solutions
Compact strength training equipment refers to high-density, space-efficient structural steel units designed for high-performance training in restricted areas. B2B buyers and distributors prioritize these models because they maximize revenue per square foot, allowing for higher equipment density in retail showrooms and boutique fitness studios.
When sourcing for clients, understanding the smallest possible space for a squat rack is not just about physical dimensions; it is a strategic financial decision. Selecting a minimal gym footprint allows distributors to offer versatile solutions that fit into urban apartments or small-scale commercial gyms, significantly expanding the potential market reach. A cost-effective procurement strategy focuses on equipment that offers high utility without excessive bulk, ensuring that the client's floor plan remains functional and profitable.
Investing in high-quality, compact-engineered steel ensures that the equipment remains a long-term investment rather than a depreciating asset. By prioritizing durability and precision engineering in smaller frames, buyers reduce the frequency of replacement cycles and minimize shipping overheads, ultimately protecting their bottom line through smarter, more efficient spatial management.
To assist in your procurement planning, we have categorized common rack configurations based on their utility and investment requirements. Choosing the right model depends on balancing the squat rack dimensions against the specific revenue goals of your facility or client. While a larger footprint may offer more features, a compact solution often provides a superior return on investment in urban markets where square footage is at a premium.
| Rack Configuration | Typical Space Requirements | Budget Level | Versatility & Utility |
|---|---|---|---|
| Wall-Mounted Folding Rack | Minimal/Foldable | Low to Mid | High for home-use/boutique setups |
| Slim-Profile Power Rack | Moderate | Mid-Range | Excellent for specialized strength zones |
| Full Commercial Rig | Extensive | High | Maximum for multi-user environments |
When implementing home gym layout tips for your end-users, always advise them to account for barbell length and plate clearance, not just the base frame. Understanding these squat rack dimensions prevents costly returns and ensures that the smallest possible space for a squat rack remains a functional, high-performance training station rather than a cramped bottleneck.
To protect your procurement margins, focus on smart purchasing strategies that prioritize multi-functional equipment. Instead of sourcing disparate standalone units, look for integrated systems that combine a rack with pull-up bars, dip stations, or storage attachments. This approach of optimizing layout ensures that every square inch of the minimal gym footprint serves a dual purpose, effectively increasing the perceived value of the installation without increasing the physical footprint.
A critical oversight in many small-scale builds is neglecting the necessary clearance for movement and safety. When calculating the smallest possible space for a squat rack, you must factor in the "operational radius"—the space required for barbell rotation, plate loading, and lateral movement. Failing to account for this during the initial sourcing phase often leads to expensive retrofitting or the premature replacement of equipment that simply does not fit the usable area. By selecting versatile, high-density gear during the first order, you minimize the risk of future upgrade costs and ensure long-term client satisfaction.
Defining the Absolute Minimum Footprint for Strength Training
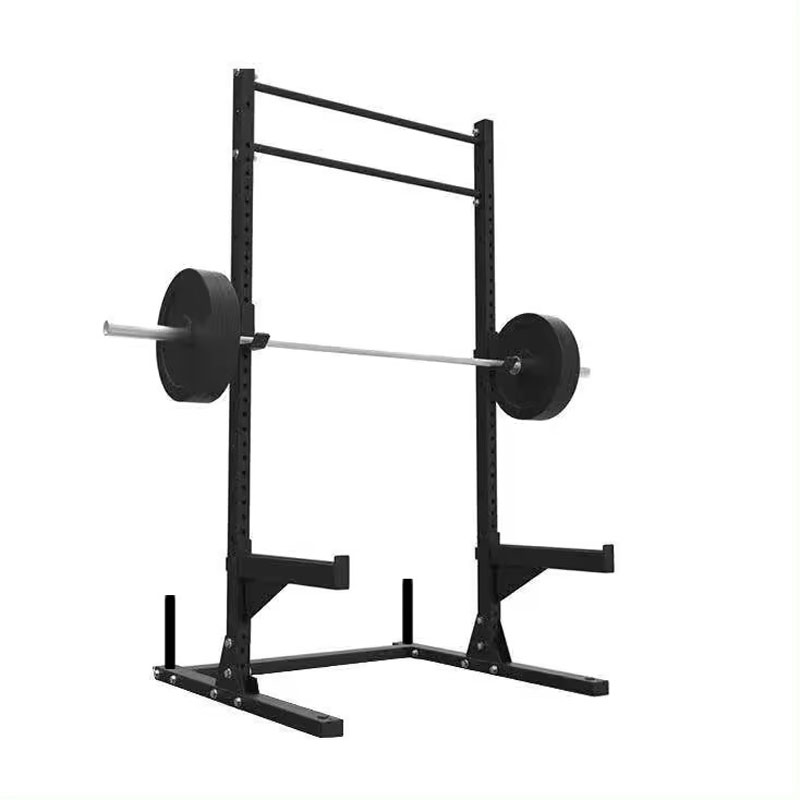
When calculating the smallest possible space for a squat rack, many buyers make the critical mistake of only measuring the base of the unit. While the squat rack dimensions provided in a spec sheet tell you how much floor area the steel frame occupies, they do not account for the actual minimal gym footprint required for a safe training session.
To avoid equipment damage or injury, you must distinguish between the static footprint and the operational safety buffer. A primary factor is the barbell length vs. rack width ratio; a standard 7-foot Olympic barbell extends significantly beyond the uprights. If your layout does not account for the barbell's full span and the clearance needed to load weight plates, your installation will be non-functional. For distributors and facility planners, ensuring this buffer is integrated into the initial site survey is essential for maintaining professional safety standards and long-term usability.
Depending on your specific installation goals, different equipment configurations will dictate your total area requirements. When implementing home gym layout tips, we recommend categorizing your setup into one of three common models to visualize your constraints effectively.
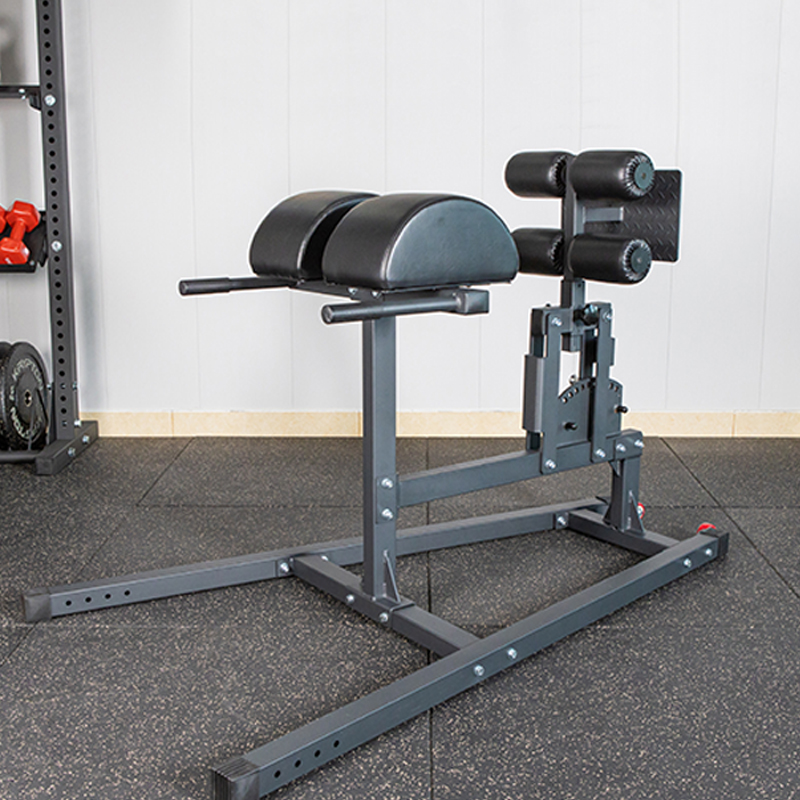
For those with extreme constraints, folding vs. fixed racks represents the most significant decision point. A fixed power rack offers maximum stability for heavy lifting but requires a permanent, larger footprint. Conversely, a wall-mounted folding rack can be tucked away when not in use, drastically reducing the minimal gym footprint during non-training hours. However, even with folding models, you must calculate the necessary clearance for plates. This includes the distance from the center of the barbell to the edge of the weight plates, ensuring there is enough room to slide plates on and off without hitting walls or obstacles. We suggest planning for at least 2 feet of unobstructed space on either side of the barbell to allow for smooth plate transitions and safe movement.
Beyond the horizontal plane, maximizing utility requires a strategic focus on vertical space utilization. In many compact facilities or residential settings, the ceiling height becomes a silent constraint. You must account for ceiling height considerations, specifically the distance between the highest point of the rack and the overhead structure. This ensures there is sufficient unobstructed movement for overhead presses or even jumping movements without risk of collision.
To keep the floor area clear, look for integrated solutions like built-in weight plate storage. Utilizing the rack’s vertical uprights for plate pegs rather than using separate floor-standing trees can significantly optimize your minimal gym footprint. By shifting storage upward, you maintain a cleaner layout and reduce tripping hazards, which is a hallmark of high-quality, professional-grade space management. Always verify that your chosen configuration leaves enough headroom for both the athlete and the equipment's highest functional point.
Critical Clearance Zones and Safety Buffers
When calculating the smallest possible space for a squat rack, many buyers focus solely on the metal frame's dimensions, overlooking the critical safety clearance required for high-performance training. A common mistake in small-scale facility planning is neglecting the barbell length; a standard Olympic bar extends significantly beyond the rack itself. Without accounting for this, you risk hitting walls or structural pillars during heavy lifts.
To maintain a professional standard of safety and durability, you must establish an obstacle-free zone around the equipment. This isn't just about the footprint of the steel, but also the space needed for lateral movement. Whether you are unracking a heavy load or adjusting your stance, having a buffer prevents accidental collisions that can damage both the equipment and the surrounding facility. For distributors and gym owners, ensuring this minimal gym footprint includes a wide enough radius for safe weight plate loading is essential to mitigate liability and ensure long-term equipment integrity.
To help you visualize the total space required for various configurations, we have compiled a reference guide. While a compact setup may seem ideal, ignoring the barbell clearance and necessary safety buffer can compromise the durability of your facility and the safety of the user.
| Rack Type | Standard Squat Rack Dimensions | Recommended Safety Buffer | Estimated Minimal Gym Footprint |
|---|---|---|---|
| Half Rack | ~1.2m x 1.2m | 0.6m (Sides/Rear) | ~2.4m x 2.4m |
| Full Power Rack | ~1.2m x 1.5m | 0.6m (All Sides) | ~2.4m x 2.7m |
| Wall-Mounted Rack | ~1.2m x 1.0m | 1.0m (Front Only) | ~2.2m x 2.2m |
When sourcing equipment, always verify if the squat rack dimensions account for the widest possible barbell or plate diameter. A robust home gym layout tip is to always add at least 60cm of clearance to the smallest possible space for a squat rack to accommodate plate loading and natural movement patterns without structural interference.
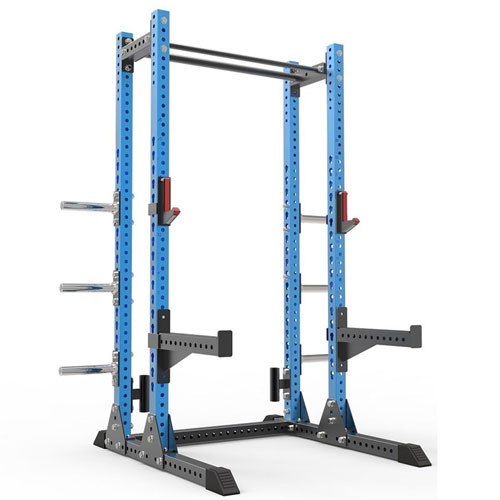
Prioritizing Structural Stability and Longevity
Optimizing a tight layout requires more than just measuring floor area; it requires a focus on long-term durability. Even within a minimal gym footprint, the way you position your equipment dictates its operational lifespan. For example, failing to account for weight plate clearance can lead to constant collisions between the barbell and nearby walls or structural supports. Over time, these repetitive impacts can degrade the finish of your steel and compromise the structural stability of the rack itself.
Effective home gym layout tips for professional-grade setups always include the installation of high-density floor protection. A heavy squat rack exerts significant concentrated force during heavy lifts; without a proper subfloor or rubber matting, the vibrations and impact can cause the frame to shift or settle unevenly. When sourcing for clients or distributors, we recommend ensuring that the smallest possible space for a squat rack includes a dedicated zone for heavy-duty mats. This not only protects the facility's foundation but also maintains the alignment of the rack, ensuring it remains a reliable, high-performance asset for years to come.
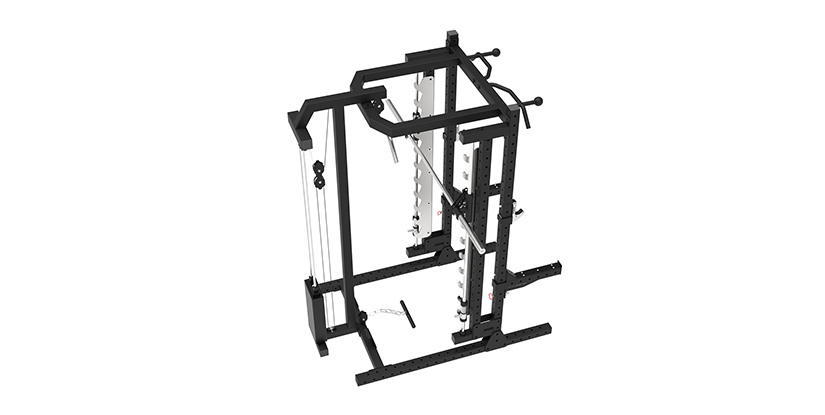
Comparing Compact vs. Full-Scale Rack Configurations
When planning a high-density training area, understanding the distinction between a compact vs. full-scale setup is the first step in optimizing your facility. For distributors and gym owners, the goal is to balance equipment utility with a minimal gym footprint. While a full-scale power rack offers maximum stability and accessory integration, it demands significant square footage. Conversely, determining the smallest possible space for a squat rack often involves selecting specialized, streamlined models that prioritize essential movement over peripheral features.
Beyond the base dimensions of the steel frame, professional procurement requires a strict calculation of clearance requirements. You must account for the length of the barbell, the movement of the weight plates, and the user's safety zone to prevent collisions with walls or other machinery.
| Configuration Type | Space Intensity | Primary Use Case | Storage Efficiency |
|---|---|---|---|
| Compact/Wall-Mounted | Low | Home studios & small boutiques | High (Vertical focus) |
| Standard Power Rack | Medium | Commercial training facilities | Moderate (Integrated pegs) |
| Full-Scale Rig System | High | Large-scale strength gyms | Complex (Requires wide layout) |
To assist in your selection process, we have outlined how different configurations impact your operational capacity. Choosing the right model depends heavily on your specific squat rack dimensions and how much room you can realistically allocate for safety and movement. Whether you are sourcing for a private studio or a professional facility, consider these variables to ensure your home gym layout tips translate into a functional reality.
| Configuration Profile | Footprint Requirement | Usage Frequency | Budget Range | Ideal User Type |
|---|---|---|---|---|
| Space-Saving/Wall-Mounted | Minimal | Low to Moderate | $ - $$ | Solo Enthusiasts |
| Compact Half Rack | Moderate | High | $$ - $$$ | Boutique Studio Owners |
| Commercial Power Cage | Substantial | Very High | $$$ - $$$$ | Full-Scale Gym Operators |
When calculating the smallest possible space for a squat rack, never overlook the "buffer zone." A rack that technically fits within a corner may still be unusable if the barbell length exceeds the available width or if the user lacks room to step back safely. Always verify the total squat rack dimensions against the barbell length to avoid costly shipping or installation errors.
To effectively navigate your selection, we recommend applying practical home gym layout tips that prioritize functional utility over sheer aesthetics. When sourcing equipment, do not merely look at the metal footprint; you must account for the movement range of the lifter. A compact rack may save floor space, but if the user cannot comfortably step into the lift or rotate without hitting a wall, the configuration fails.
Furthermore, professional procurement should always factor in weight plate storage and safety clearance. For instance, a wall-mounted unit offers a minimal gym footprint, but you must ensure there is enough lateral room for plate loading and unloading. If the smallest possible space for a squat rack does not account for the thickness of bumper plates or the swing of a barbell, your facility will face operational bottlenecks. Always visualize the "active zone" to ensure your chosen squat rack dimensions accommodate both the hardware and the human element.
Strategic Layout Tips for High-Density Training Areas
When optimizing for the smallest possible space for a squat rack, many distributors and facility planners make the mistake of focusing solely on the metal frame's footprint. However, true efficiency requires accounting for "functional clearance." If you only allocate the minimal gym footprint based on the rack's base dimensions, you risk creating a hazardous environment during high-intensity sessions.
To ensure long-term durability and user safety, you must factor in barbell rotation space. This involves the lateral movement of the bar during unracking and the swing of the weights during a lift. Without adequate safety clearance around the station, equipment can strike walls or adjacent machines, leading to structural damage or unexpected mechanical failure. For professional importers, advising clients to include an extra 2–3 feet of buffer zone is essential to maintain high standards of safety and equipment longevity in cramped commercial or residential settings.
To assist in your procurement decisions or client consultations, we have categorized common configurations below. Understanding the trade-off between space vs. utility is critical when sourcing equipment for urban fitness studios or compact home gyms. Always prioritize barbell length considerations; a standard 7-foot Olympic bar requires significantly more lateral room than a shorter specialized bar, regardless of the rack's base size.
| Layout Style | Primary Focus | Typical Footprint Needs | Best For |
|---|---|---|---|
| Ultra-Compact | Maximum Floor Savings | Narrow base + short bar | Small residential setups |
| Standard Functional | Balanced Utility | Full squat rack dimensions + 3ft clearance | Commercial boutique studios |
| Full Performance | Unrestricted Movement | Wide clearance for plate loading | High-traffic training centers |
When applying these home gym layout tips, remember that the smallest possible space for a squat rack is not just about the floor area, but the total volume of movement. For distributors, ensuring clients understand these squat rack dimensions prevents costly returns and ensures the equipment performs reliably within its intended environment.
Optimizing Maintenance and Longevity in Compact Setups
Managing high-density training areas requires a proactive approach to maintenance to prevent rapid wear. When a facility operates within the smallest possible space for a squat rack, dust, sweat, and debris tend to accumulate more quickly in the tight gaps between equipment. We recommend that facility managers prioritize high-grade floor protection, such as high-density rubber flooring or impact-resistant mats. This not only shields the subfloor from heavy plate drops but also simplifies equipment upkeep by creating a seamless, easy-to-clean surface.
Furthermore, accessibility is a vital component of long-term maintenance. Avoid placing the rack so close to walls or other machinery that a technician cannot reach the bolts or adjustment pins. Ensuring there is enough room for a person to maneuver around the station allows for regular inspections of the structural integrity. For distributors and B2B buyers, emphasizing these home gym layout tips ensures that even the most compact installations remain functional, hygienic, and safe for long-term commercial use.
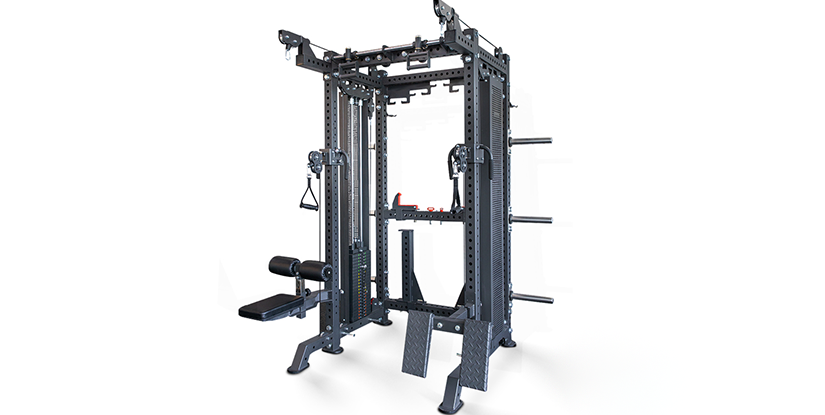
Sourcing Versatile Equipment for Limited Real Estate
When optimizing a commercial or high-end residential facility, the goal is to maximize revenue per square foot. Investors often realize too late that a bulky, single-use setup creates dead space, reducing the overall utility of the facility. To achieve the smallest possible space for a squat rack without sacrificing training quality, savvy buyers should prioritize multi-functional design. Instead of sourcing standalone units, look for integrated systems that combine a rack with pull-up bars, dip stations, or cable attachments.
Selecting equipment with high-value space-saving features ensures your layout remains adaptable. By focusing on a minimal gym footprint, you can accommodate more high-demand stations within a smaller area, effectively increasing your asset's utility. High-quality, modular builds allow you to scale your offering as your client base grows, ensuring that your initial investment in compact strength solutions delivers a long-term return through versatility and efficient floor plan management.
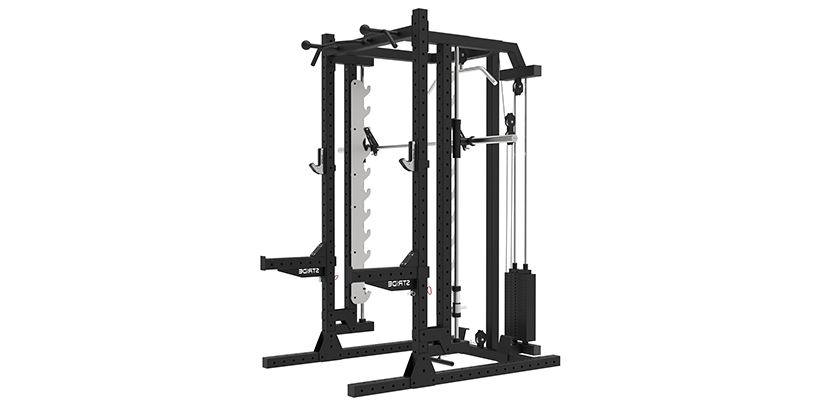
To maximize your return on investment, you must weigh the trade-offs between permanent installations and adaptable hardware. Choosing the right configuration depends heavily on your specific squat rack dimensions and the intended intensity of the training environment. For instance, folding racks vs. fixed racks represent two distinct philosophies in space management. A fixed rack offers superior stability and structural rigidity, making it the gold standard for high-traffic commercial settings, yet it occupies a permanent footprint. In contrast, folding models can be tucked against a wall when not in use, drastically reducing the minimal gym footprint during off-peak hours.
Consider the following comparison to guide your procurement strategy based on your space-to-utility ratio:
| Equipment Type | Space Requirement | Primary Benefit | Ideal Use Case |
|---|---|---|---|
| Fixed Power Rack | High (Constant) | Maximum Stability | Full-scale Commercial Gyms |
| Folding Wall-Mount | Low (Variable) | Extreme Versatility | Small Studios or Home Gyms |
| Modular Half Rack | Moderate | Balanced Utility | Boutique Training Facilities |
Effective home gym layout tips suggest that while folding units save floor area, they may require more complex installation. When sourcing, always verify that the mounting requirements for space-saving models do not compromise the structural integrity of your facility's walls, ensuring your investment remains both compact and durable.
Beyond mere dimensions, the true value of your procurement lies in the intersection of density and durability. It is a common mistake to prioritize a smaller footprint at the expense of structural integrity, which often leads to premature replacement costs. To ensure a long-term investment, we recommend sourcing compact strength training gear that utilizes high-gauge steel and reinforced welding. Even when seeking the smallest possible space for a squat rack, the gauge of the steel and the quality of the powder coating must remain non-negotiable to withstand heavy loading cycles.
A rigorous quality control process from your manufacturer is essential when ordering specialized, space-efficient models. Compact designs often involve more complex mechanical parts, such as folding hinges or wall-mounting brackets, which are high-stress points. By vetting factory capabilities and ensuring strict adherence to manufacturing standards, you secure equipment that maintains its structural stiffness over years of use. Ultimately, high-quality, dense engineering provides the best long-term investment, preventing the need for frequent upgrades and ensuring your facility remains both efficient and robust.
Common Spatial Pitfalls in Small-Scale Facility Planning
When distributors or boutique gym owners attempt to optimize for the smallest possible space for a squat rack, they often fall into the trap of measuring only the physical footprint of the steel uprights. This oversight ignores the critical "invisible" zones required for safe, high-performance training. One frequent mistake is failing to account for plate loading space; if your squat rack dimensions do not allow for the full diameter of weight plates plus the thickness of the barbell sleeves, your installation will be functionally useless in a tight corner.
Furthermore, professional-grade planning must consider the kinetic energy of the equipment. A common oversight in minimal gym footprint design is neglecting clearance requirements for barbell whip. When lifting heavy loads, the bar oscillates; without adequate lateral buffer zones, the bar can strike adjacent walls or equipment, compromising both safety and the longevity of the rack. To ensure a professional standard, always calculate your total area based on the widest point of movement and loading, rather than just the static metal frame.
To visualize the actual footprint required for your facility, it is essential to compare different equipment configurations. While a basic rack might seem compact, the total area occupied changes drastically based on the specific accessories and loading styles you choose. Effective home gym layout tips suggest that you should always plan for the widest possible diameter of movement rather than the static frame size.
| Equipment Type | Primary Space Driver | Operational Footprint Impact |
|---|---|---|
| Standard Squat Stand | Barbell length | Requires full width of the bar plus side clearance. |
| Half Rack / Combo Unit | Safety spotter arms | Increases depth requirement for safe unracking. |
| Full Power Cage | Weight plate diameter | Maximum width needed for loading/unloading plates. |
When calculating the smallest possible space for a squat rack, remember that a minimal gym footprint is achieved through smart selection, not by ignoring safety. Always account for the weight plate diameter and the space needed to maneuver around the barbell length to ensure your installation remains functional and durable under heavy use.
Beyond initial installation, long-term maintenance and structural integrity are often compromised by extreme spatial constraints. When a facility is overly crowded, the lack of adequate safety margins leads to more than just physical collisions; it creates a high-risk environment for the equipment itself. For example, if a rack is positioned too close to a wall or another machine, the constant vibration and unintended contact from heavy barbell movement can destabilize the unit over time. This lack of clearance often results in compromised structural stability, as the lateral forces exerted during a lift are not properly absorbed by the intended footprint.
Furthermore, neglecting the surrounding area can lead to significant secondary costs. Inadequate floor protection is a common byproduct of cramped layouts. When users lack sufficient room to step back or move plates, they are more likely to drop weights outside the intended zone, causing cracks in flooring or damaging the subfloor. From a procurement and facility management perspective, investing in slightly more space or higher-quality floor protection is a proactive way to prevent the premature wear and tear that occurs when a gym becomes a cluttered, high-friction environment.